Resolved
About processing of work
-
VIEW 2,532
-
Total 14
by
 鳴神ノア
鳴神ノア
鳴神ノア


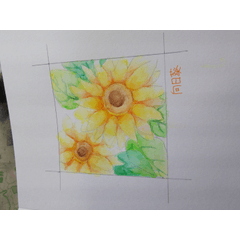
When I process it, the saturation goes up, it will become a different color from the original.
Please tell me how to make light and bright processing like 【Budapest】 of image filter of LINE.
Also, if you do not process it will be different from your own processing with vivid. How much saturation will you color the pale image?
I am conscious of the upper left, which divided the color circle palette into four equal parts.
Published date : 5 years ago
Updated date : 5 years ago
Best Answer
-
5 years agoOriginally it used "tone curve" of "color correction layer"
The illustration was hard and I could not get together
I think that you can choose colors freely rather than using a tone curve for what you try newly
However, because we used something that I have never used, excluding synthetic mode
I do not know the disadvantages or the advantages
It will be the continuation of that long explanation
The composition of the layer palette is also the same as it is
I only need to create two "hue, saturation, and brightness" of the color correction layer
Each one is meaningful and easy
I will illustrate as much as possible, but I do it for simple tasks only with letters
It is continuation.
I want to regain skin redness
"Duplicate" the bottom "original illustration layer" and bring it to the top
"Color picker" picks up the color of the skin color good part
From the "Layer" menu, select "Solid" in "New Layer"
I think that a "solid coat layer" of the color selected by "color picker" will be created
Clip the solid fill layer with "Lower layer"
Continue to set "Composite mode" of solid color layer to "Exclude"
(I figured out from the name of the synthesis mode that I thought that I excluded the color I chose)
Join this to "Layers below"
As it is, select "Hue, Saturation, Lightness" from "Color Tone Correction" in the "Edit" menu
Set "saturation" to (-100) and make it "gray"
"Duplicate" the grayed layer
Make the "composite mode" of the duplicated layer "dodging color"
(I think that the darker part will be adjusted
I think that the color is dark around the selected skin color)
"Merge into the lower layer"
Choose "Convert brightness to transparency" from the "Edit" menu
Hide the layer "convert brightness to transparency" (because it disturbs you when you see it)
(Ctrl + click) the thumbnail
I think the layer is selected range
(It seems that the selection range will be selected even if the layer is hidden)
With the selected range, select "Hue, Saturation, Lightness" from "New color correction layer" of "Layer" menu
I tried "hue" as (20) "saturation" as (20)
I think that the reddishness of the skin color has increased
Increase the saturation of the green in the skirt
It is the same as skin (illustration is also skipping)
"Duplicate" the original illustration at the bottom and lift it to the top of the layer
Pick up the skirt green with 'color picker'
We will create a "solid layer" with the colors we picked up
"Clip on the lower layer" will do
Make "synthesis mode" "exclusion"
Join to the lower layer "as it is
Choose "Hue, Saturation, Lightness" from "Color Tone Correction" in the "Edit" menu
Set "Saturation" to (-100) and make it gray
Duplicate the grayed layer
Make the "composite mode" of the duplicated layer "dodging color"
Select "Convert brightness to transparency" on the "Edit" menu
Hide "convert brightness to transparency"
(Ctrl + click) the thumbnail of the hidden layer
I think that "selection range from layer" is made
Select "Hue, saturation, and lightness" of "New color correction layer" from "Layer" menu
I tried "hue" as (10) "saturation" as (30)
Finish
It was a good lesson to use "exclusion" which I thought would not be used
Thank you
There might be typo etc.
Please listen to places you do not know

-


Did you find this helpful?
Open questions in same division

Open

Open


Unanswered questions

Open

Open

Open

Open

Badges
-
 MVP ◆This user has contributed greatly to the management of the community, by posting many great responses to the questions asked. Once every three months, MVPs are determined based on the points earned during that period and will be recognized accordingly.
 -
 New Valuable Player (NVP) ◆These are the next-best contributors to the community after MVPs. This is awarded to users who have not yet won an MVP award, based on the number of points they have earned.
 -
 Official Expert ◆Chosen out of all MVP awardees, who are already proof of excellence, this is a testimony of outstanding correspondence in the community. After careful screening, they are appointed by CELSYS and assume their position.Note: Formally called “Evangelists”
 -
 Official Moderator of CELSYS ◆Moderators are official CELSYS staff members who are fluent in Japanese as well as various other languages. Moderators are not experts on the software or illustration, so they are not able to directly answer your questions. However, moderators provide communication and language support to ensure that everyone can smoothly communicate with each other.
 -
 CELSYS official accountThe Official Administrator Account